This blog is the first in a series that explores building and running the OpenTAP test engine on ARM-based systems. This first article will explain how to build OpenTAP from source code on
an Apple M1 host running Ubuntu Linux in a virtual machine
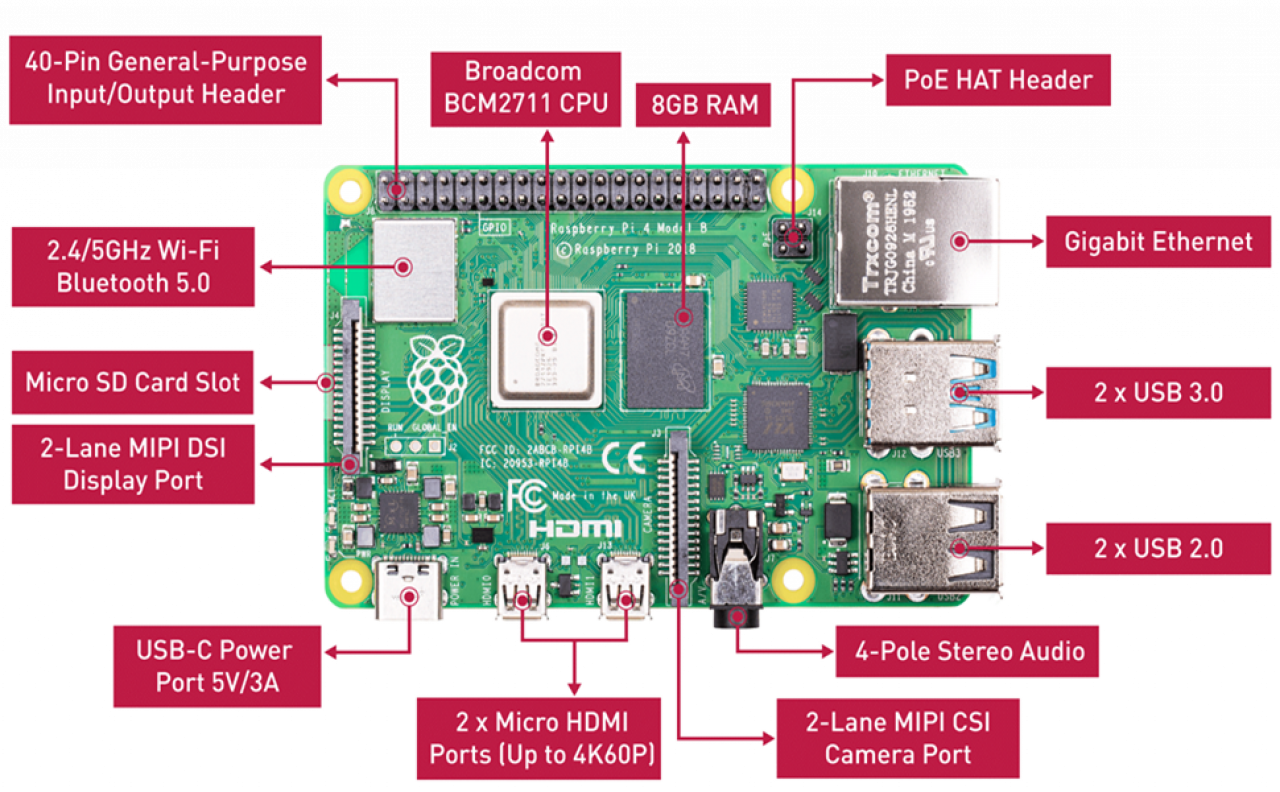
an ARM64-based Raspberry Pi system
natively under MacOS on an M1-based host
Subsequent blogs will explore building open source tools (e.g., TUI) and plugins for OpenTAP on ARM-based systems, and setting up basic test benches on these systems.
How Most Users Run OpenTAP Today
Today, telemetry gathered by Keysight and by the OpenTAP community clearly illustrate that most OpenTAP users and developers install and run the test automation engine on workstations and other hardware running versions of Microsoft Windows executing on Intel Architecture. The OpenTAP project also supports installation and execution on Intel Architecture Ubuntu Linux systems but currently does not officially support ARM-based hardware.
Why Deploy OpenTAP on ARM?
For the last decade, ARM (Advanced RISC Architecture) has come to dominate embedded systems, IoT designs, and mobile computing (wireless phones and tablets). More recently, Apple began to deliver notebooks and workstation hardware based on its proprietary M1 and M2 ARM-based processors, offering very high performance combined with low power consumption.
Given the ubiquitousness of ARM in applications and markets served by OpenTAP and OpenTAP-based test equipment from Keysight, it follows that hosting the OpenTAP engine on an ARM-based system is sensible and probably inevitable.
Steps for Building OpenTAP from Source
Today, the OpenTAP project and also project sponsor Keysight supply and support OpenTAP and associated plugins for Intel Architecture hosting only. However, since OpenTAP is open source, we can rebuild the platform and at least a part of the tool and plugin portfolio to run on ARM-based systems.
Download and Install Microsoft .NET
OpenTAP is written in C# and based upon the Microsoft .NET version 6 framework. For non-Windows systems, each platform can require a somewhat unique procedure to install. While .NET is itself open source, building that framework from source is beyond the scope of this exercise . Fortunately, there exist pre-built (binary) versions of .NET for ARM-based CPUs and the OSes that run on them.
.NET is made up of the runtime and the SDK. The runtime is used to run a .NET app and may or may not be included with the app. The SDK is used to create .NET apps and libraries. The .NET runtime is always installed with the SDK.
Note that .NET may not install in the same location under different OSes. Issuing which dotnet shows this path as
/usr/bin/dotneton Ubuntu
/usr/local/bin/dotneton Raspberry Pi
/usr/local/share/dotnet/dotneton MacOS
Also check the version with dotnet --version, which should be 6.0.XX. Make sure that the installation directory is already on your $PATH or add it yourself in .bashrc.
You should probably also check to see if both the SDK and runtime are present and up-to-date by issuing the command
dotnet sdk check
On Ubuntu Linux
This instance of Ubuntu Linux 22.04 is actually running in a virtual machine (VM) under MacOS on a MacBook Pro powered by an M1 Pro CPU and was supplied by desktop VM vendor Parallels.
.NET for Ubuntu Linux is readily available via the apt-get package manager, as described in this article, with a key difference: we want to install version 6 vs. version 7.
To install the .NET SDK, open a bash shell and enter the following:
sudo apt-get update && \
sudo apt-get install -y dotnet-sdk-6.0
You will need to enter the system password to use sudo.
On RaspberryPi
Raspberry Pi OS (a.k.a. Raspian), the version of Debian Linux targeting Raspberry Pi hardware, does not offer .NET via its package manager. So you'll have to download the SDK and runtime manually. There are two useful articles on alternate methods for obtaining and installing .NET under for a Raspberry Pi host:
Deploy .NET apps on ARM single-board computers (Microsoft)
Install and use Microsoft Dot NET 6 with the Raspberry Pi (Pete's Codes)
Another caveat is that .NET will only execute on ARMv7-based CPUs, excluding the use of older Raspberry Pi hardware. The system used for this article is a Raspberry Pi 4 Model B, which embeds a Broadcom BCM2711 CPU, built on the ARM Cortex-A72 architecture.
I used the following command to download and install .NET version 6
wget -O - https://raw.githubusercontent.com/pjgpetecodes/dotnet6pi/master/install.sh | sudo bash
When the installation is complete, reboot your system with
sudo reboot
On MacOS
MacOS is actually a supported .NET host. On your MacOS browser of choice, (Safari, Chrome, etc.) navigate to https://learn.microsoft.com/en-us/dotnet/core/install/macos to learn about .NET on MacOS. To download the .NET installation files, visit https://dotnet.microsoft.com/en-us/download/dotnet/6.0 and choose the SDK download for Arm64 (for M1 and M2 Mac hardware).
The file dotnet-sdk-6.0.315-osx-arm64.pkg (or a newer version) will automatically download and should appear in your Downloads folder.
Double click the package file or type open dotnet-sdk-6.0.315-osx-arm64.pkg in a shell. In either case, you will be presented with a UI-based installation application dialog box.
Download and Build OpenTAP
Downloading and building OpenTAP from source code is the same for all three types of host systems.
Downloading
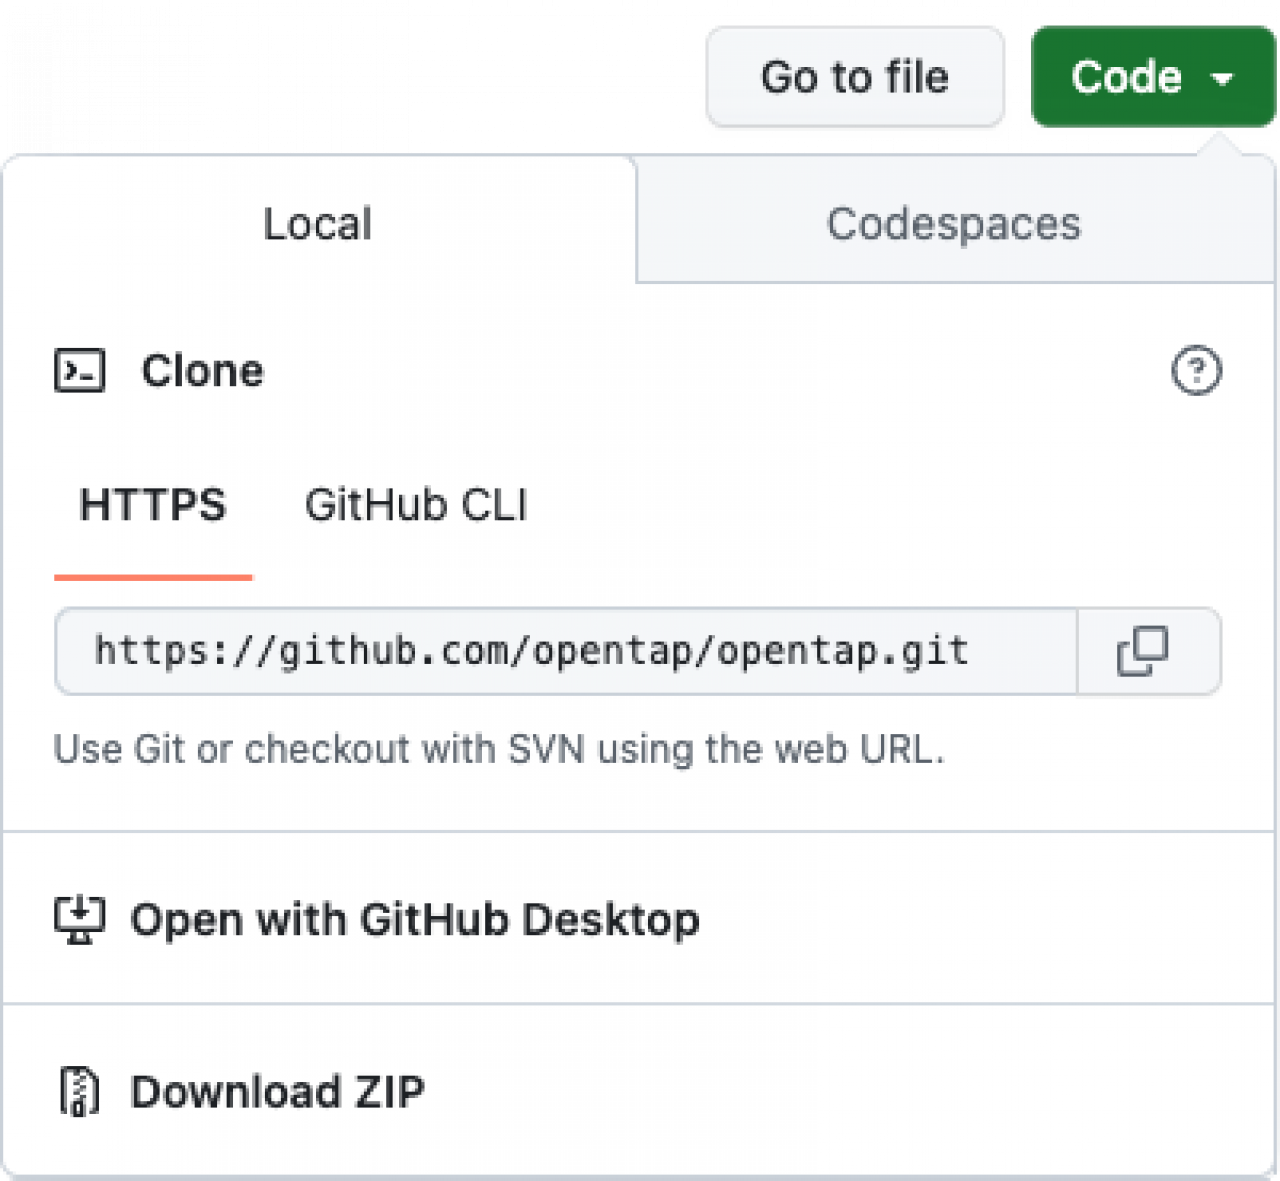
Start by visiting the OpenTAP project repository (https://github.com/opentap/opentap) on GitHub. Click on the Code button; you can either choose to clone the project to use in a local GIT repository or just download a ZIP archive of the OpenTAP project. The author recommends downloading the ZIP archive as the simpler path - OpenTAP users are unlikely to have GIT installed on the ARM-based systems in question.
Move the ZIP file (opentap-main.zip) from the Downloads folder to your home directory or to a new folder of your choosing and use the unzip utility to decompress the archive:
unzip opentap-main.zip
which will create a new directory ./opentap-main/
Resolve Dependencies
On Linux systems, resolve additional dependencies with the command
sudo apt install libc6-dev libunwind8 curl git -y
This article covers resolving .NET dependencies on MacOS.
Building OpenTAP
The project README.md file provides instructions on how to build OpenTAP and testit , but let's call out the key steps here, as follows:
Change directory (cd) into opentap-main/
Next, issue the following .NET commands to create a tap executable:
dotnet build -c Release
dotnet publish -c Release
dotnet publish -c Release tap/tap.csproj
Notes on building:
The
-c Releaseoptions builds a release version, vs. the default debug version.Follow these links to detailed documentation of the build and publish commands
The resulting tap executable should now reside in the directory opentap-main/bin/Release. You will need to add this path to your $PATH or create a link to it from a directory already on your invocation path, e.g., in /usr/local/bin.
Testing OpenTAP
The OpenTAP project includes a set of tests you can invoke with
dotnet test
You can also just run tap with options like
tap package list
Conclusion
This blog has amply demonstrated how hosting the OpenTAP test automation engine itself on ARM-based systems is a relatively straightforward task. Since OpenTAP is built with .NET, it enjoys the hardware abstraction provided by the Microsoft application framework, with very few hardware-specific dependencies or idiosyncrasies. Implementation of OpenTAP plugins written in Python should enjoy the same hardware and system independence. But the operative word is should.
Importantly, the OpenTAP engine is not sufficient by itself to address the gamut of test automation requirements. In future blogs we'll look at real-world use cases and the ability to obtain source code and build tools and plugins to meet those needs.
Potential challenges include
Availability of source code for various plugins and tools
Dependence of tools on Windows-only UIs and other software and of plugins on libraries and DLLs not available on Linux
Specific dependencies of plugins on underlying peripheral hardware and/or implementations in Intel Architecture assembly language
In light of these challenges, in future blogs, we'll focus on building specific tools and plugins for ARM-based host systems.